Zero-1-Earth!

To content | To menu | To search

Thursday, December 11 2008

Creating dummy (empty) files

For testing shell tips (linux and cygwin) it is often handy to

  • work a test directory
  • make some (tons of!) files

Ok, I suppose you can create directories (mkdir dirname). Now, you can use touch to create (empty) files:

touch a b c d

will create files a, b, c and d.

To create 200 file starting their names with file_, followed with a number and ending with .img, do

mkdir source
cd source
for ((num=0;num<200;num+=1)); do touch file_${num}.img ; done

Now you can tests the shell tips (example).

Batch renaming files

Whether you are using linux (bash or shell) or cygwin, renaming a (large) set of files is really easy. Because renaming a file and changing its location is the same thing for linux and cygwin, you've got a large set of possibilities.

First example. Say you have 200 files in a directory that must receive a prefix like new_. Here is what you can write from the prompt.

for f in * ; do mv $f new_$f ; done

and ALL files in the current directory have their names starting with new_ now. The star * tells to consider any file. For each file found, its name is stored in the variable f and the command mv $f new_$f is executed. The $f is replaced by each filename. Moving the files to another place is trivial. Say you have a directory named source and another named target, you can:

cd source for f in * ; do mv $f ../target/new_$f ; done cd ..

(you can use cp instead of mv to copy the original files to another named file).

Second example. Now you want to change the file extension. It comes that bash lets you do some operations on the variables. For example, if f contains a string that ends with .img, say my_image.img, the instruction ${f%.img} would remove the extension .img from the end of the string (more manipulation in future posts). Renaming files ending with .img with .ida would be:

for f in *.img ; do mv $f ${f%.img}.ida ; done

More on files manipulation in future posts!

Friday, December 5 2008

By the way, what is an image file format?

Some beginners would like to ask but do not dare:

What is a file format?

To start, let's say it is only the way the data are written in your file. In principle, it should not affect the image itself.

Ok, but an image is only a 2D array (the image is a rectangle), with optionally a third dimension to store bands. A very straightforward way of saving this data in a file is simply to copy the matrix into the file in a very plain way: 1st pixel, 2nd pixel, 3rd pixel, etc up to the last pixel of the first line, then continue on the next line, and so on to the end of the image. This is what does the Envi format. When you have bands, you can even choose if you want to write all the bands values of the same pixel in a row, or write the image of the first band first, then append the second band, etc. In any case, you've got something that is very similar to a copy of the computer memory where the file as to be placed when it is read.


In raw file formats like Envi/IDL, the meta-information is written in a second text file. The rule is usually that the text file as the same name as the data file, only the extension changes (.hdr for Envi).
What is this made for? Well, the data stored in the binary file is only a series of numbers (the pixel value for each band), tey are all inlined. To display it as an image, you need to know the image's dimensions. Basically, when you start drawing the image on screen, you must know when to go back to the next line. In addition, the image can have several bands, so you need to know when to start and stop drawing a given band (or to which channel, red, green or blue to copy the data you are reading in the file). The pixel value can be encoded on a byte or an integer or float values in your file, and you need to save this information too. For geo-referenced images, you have to give also the projection, pixel sizes and at least the upper left coordinates of the image.

If you have an Envi file, say africa.hdr, simply display the content of the hdr file:
more africa.hdr
the content should be something like:

ENVI
description = {
ENVI File, Created [Wed Aug 20 10:07:18 2008]}
samples = 9633
lines = 8177
bands = 1
header offset = 0
file type = ENVI Standard
data type = 1
interleave = bsq
sensor type = Unknown
byte order = 0
map info = {Geographic Lat/Lon, 1.0000, 1.0000, -26.00446429, 38.00446429, 8.9285714286e-03, 8.9285714286e-03, WGS-84, units=Degrees}
wavelength units = Unknown


Now, the second beginner's question is

why do we have several files formats?

In the past, most formats used to be proprietary, i.e. they were designed by a company to be used with a given software and the specifications of the format (how you read and write the file) were not publicly available.

Although the idea of making a copy of the memory on disk and of storing meta-information in a text file is easy to understand and to handle through a simple piece of home-made code, it is not robust enough for the most usage, whether it is about photography or satellite imagery. A single file, containing the meta-information of the image is way more robust: easier to carry, no chance to loose the meta-information text file, to rename the image and forgot to rename the text file, or to corrupt the file when editing it! In addition, a plain copy of the memory is not very efficient in term of disk usage and access.

Long stories made short, more sophisticated ways of storing files were found.
First, most file formats store their meta-information and image in a single file, second, the arrangement of data (I mean the pixels values) inside is also optimized. For example, geotiff stores values by groups of lines, a table indicating where to jump in the file to access to a given chunk of data.

For sure, with data format that are not a plain copy of the memory, you need a driver to read/write the file. Learning how to use those libraries is the price to pay to get more efficiency. I'll say more in next posts.

Among the tons of options allowed by modern formats, there is one I appreciate a lot: the internal compression. Satellite images, and especially derived products like classifications and masks, can have higly redundant information: a group of pixels can have the same values (like same class code), or in an image, large surfaces like ocean can have the same value. In this case a lossless compression can save a lot of space on your hard-drive. But if you zip your file, you need to unzip it, which can become very dull. It is way better to have the data compressed inside the image, so the decompression task  is done on the fly by the driver, seamlessly (and very quickly).

I'll say more on lossless compression  in a future post. In the mean time, have a look to format details on http://www.gdal.org/formats_list.html (click on each format name to know more).

Thursday, December 4 2008

What format is this image?

Have you ever wondered what is really the file format of an image? Or what are the 4 corners coordinates, or the projection? You can get the answer in a single command line. Say we want to know more about an image name africa.img. Actually the file extension, .img can not be considered as a trustful indication of the real format inside the image, since you can change it as you like. Extensions are only a file naming convention and have nothing to do with the data really written in the file (and the format is much more HOW is written the data).

The command gdalinfo accepts several parameters, to know them simply type:

gdalinfo

and you get a list of optional parameters (which can change in future versions), the only mandatory parameter being the filename (datasetname):

Usage: gdalinfo --help-general -mm -stats -nogcp -nomd -mdd domain* datasetname

To get accurate information on the command line, have a look on <a title="gdalinfo help page" href="http://www.gdal.org/gdalinfo.html" target="_blank">http://www.gdal.org/gdalinfo.html</a> <!nextpage> To guess what is the file format of africa.img, type: gdalinfo africa.img which is the gdal command line that scans for you the file meta-information.

Driver: GTiff/GeoTIFF Size is 963, 818 Coordinate System is: GEOGCS["WGS 84", DATUM["WGS_1984", SPHEROID["WGS 84",6378137,298.2572235629972, AUTHORITY"EPSG","7030"], AUTHORITY"EPSG","6326"], PRIMEM"Greenwich",0, UNIT"degree",0.0174532925199433, AUTHORITY"EPSG","4326"] Origin = (-26.004464290000001,38.004464290000001) Pixel Size = (0.089285714285714,-0.089285714285714) Metadata: AREA_OR_POINT=Area Image Structure Metadata: COMPRESSION=LZW Corner Coordinates: Upper Left ( -26.0044643, 38.0044643) ( 26d 0'16.07"W, 38d 0'16.07"N) Lower Left ( -26.0044643, -35.0312500) ( 26d 0'16.07"W, 35d 1'52.50"S) Upper Right ( 59.9776786, 38.0044643) ( 59d58'39.64"E, 38d 0'16.07"N) Lower Right ( 59.9776786, -35.0312500) ( 59d58'39.64"E, 35d 1'52.50"S) Center ( 16.9866071, 1.4866071) ( 16d59'11.79"E, 1d29'11.79"N) Band 1 Block=963x8 Type=Byte, ColorInterp=Gray Band 2 Block=963x8 Type=Byte, ColorInterp=Undefined

The first line tells you which driver was used to open the image, in this case GeoTiff (changing the filename extension did not have an impact on the capacity to guess the real format). The size of the image is 963 columns by 818 lines. If you have a look at the bottom of the information block, you can see that there are 2 bands. The information Block=963x8 tells you that data are stored by chunks of 8 lines (each line has 963 columns). Most of the lines describe the coordinate system. Here we have a geodetic system (EPSG:4326) on a WGS_1984 spheroid (which parameters are 6378137m at the equator and an inverse flattening factor of about 298.25722). The origin of the image, which corresponds to the corner of the upper left pixel (and not the center of the upper left pixel) is about longitude=-26.004464&deg;, latitude=38.00446429&deg;. The list of pixel coordinates gives you the coordinates of the extreme corners of the image (each time on the corner of the pixel itself, not its center), in decimal and degree, minute, seconds, and the center of the image. The pixel sizes along columns and lines directions are: Pixel Size = (0.089285714285714,-0.089285714285714) The second dimension is negative, since the latitude decreases when the line number increases.

You can see also that the image has internal compression (COMPRESSION=LZW), which is here LZW: it is a loss-less compression.

Now, you can also ask <code>gdalinfo</code> to compute the minimum and maximum on each band, call: gdalinfo -mm africa.img

which returns: Band 1 Block=963x8 Type=Byte, ColorInterp=Gray Computed Min/Max=0.000,226.000 Band 2 Block=963x8 Type=Byte, ColorInterp=Undefined Computed Min/Max=0.000,249.000

You can even get some stats per bands: gdalinfo -stats africa.img and you get:

Band 1 Block=963x8 Type=Byte, ColorInterp=Gray Minimum=0.000, Maximum=226.000, Mean=34.399, StdDev=42.502 Metadata: STATISTICS_MINIMUM=0 STATISTICS_MAXIMUM=226 STATISTICS_MEAN=34.399073799024 STATISTICS_STDDEV=42.501847553726 Band 2 Block=963x8 Type=Byte, ColorInterp=Undefined Minimum=0.000, Maximum=249.000, Mean=59.023, StdDev=77.417 Metadata: STATISTICS_MINIMUM=0 STATISTICS_MAXIMUM=249 STATISTICS_MEAN=59.023071239784 STATISTICS_STDDEV=77.416626675081
Tuesday, December 2 2008

Changing geospatial images file format

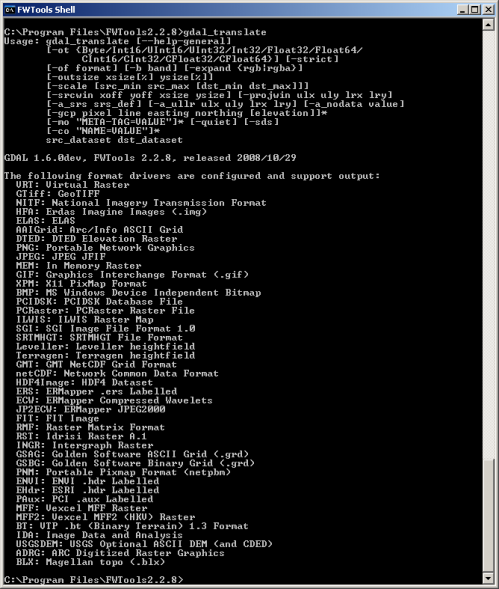
In the field of Earth Observation, a wide range of file formats exists. Many of them come from software which imposed their home made formats, like Erdas-Imagine HFA files or Envi/IDL file format, while others where created by reasearch groups like HDF made by the HDF group of the University of Illinois or geotiff which is an effort of the open source community in which many Universities or companies are involved. Unfortunately, it comes that the file format with which you are provided is not necessarily the one you wish to have, whether it is not supported by your software or that it does not match some database requirements. To make these changes I use gdal_translate which is one of many commands available from FWTools package or from a gdal installation. First install gdal, or better FWTools on your PC, and get some data. We will use the commands from the shell, ms-dos or linux shell (bash for example), the path to your gdal commands (or FWTools commands) must be correctly set. To know if everything works, run the FWTools shell (or open an ms-dos box) or go to your linux prompt and type: gdal_translate The command should answer a long text like this one: 
The first section of the text gives you the list of options you can use along with the command line, following the classical convention: parameters between brackets [ ] are optional, braces { } give you a list of choices, parameters without brackets [ ] are mandatory.
Hence, the minimal command you can invoke is
gdal_translate file_in file_out
which will export your input file (in any supported format) into the default output (which is geotiff).
Let's say you want to transform an Erdas Imagine file named africa.img into a geotiff image named export_africa.tif, you simply write
gdal_translate africa.img export_africa.tif
gdal_translate guesses the input format, you do not even need to know it!
Now you can use the -of option to define the export format. Say you want to export to Windisp file format (which name is IDA) and the output image in IDA format to be named africa.ida, you have to write:
gdal_translate -of IDA africa.img africa.ida
Of course, it works only if you input image is in Bytes (8bits) since IDA format only support 8bits. A short list of format (a reminder) is visible if you type gdal_translate To see the exhaustive list of formats, type
gdal_translate --formats
The list is rather impressive and tells you if you can read only (ro) or read and write (rw) or even read, write and update existing files (rw+). Type
gdal_translate --formats | more
to pause when displaying the information (press ENTER to move forward by one line or space to move by one page).
You can see that you can read, write and update geotiff or Erdas Imagine formats
GTiff (rw+): GeoTIFF
HFA (rw+): Erdas Imagine Images (.img), you can read and write ERMapper Compressed Wavelets images ECW (rw): ERMapper Compressed Wavelets but only read HDF5 images
HDF5 (ro): Hierarchical Data Format Release 5
You can find more details about formats on the gdal page.
Do not forget that some formats, like windisp IDA, do not support all data types. For example windisp IDA only supports Bytes (8 bits data). When exporting to this format, you must be sure that your original data can be stored on Bytes, else you need to apply a rescaling of the data.
In next posts, we will see how to use the other options.

Sunday, September 28 2008

Hello world

This blog is mostly about informatics for processing Earth-Observation data.

After more than 13 years in various fields of applications of remote sensing, from research on radiative transfer modelling and inverse problem theory to applications like precision farming or environmental assessment, I came to the conclusion that the lack of skill in informatics can be a serious bottleneck.

Anywhere I’ve been working, I’ve seen brilliant colleagues struggling for days against processings that can be done in some minutes, if they would have known some command lines. The fact is that desktop applications propose predefined functions, but when comes time to do something slightly different, the basic user has to go through many manipulations before getting the expected result. The most frequent manipulations include importing/exporting processing through several file formats to satisfy each software, applying masks to limit the range of application of each function, explode the steps of an algorithm in many intermediate files, to name a few.

In this blog, I’ll drop tips and scripts about some scripting languages. I’ll mostly focus on python/gdal, although I plane to give tips and scripts on windisp (well known in developping countries) and IDL/Envi (which I found to be very convenient, as long as you can afford to pay a licence). A good deal of the posts will also give tips on the good usage of linux and ms-dos for handling files without pain.

page 2 of 2 -